Use this dialog to perform database maintenance functions.
To open the Maintenance dialog, select ![]() Setup in the Administration menu, or click the Setup dialog launch icon
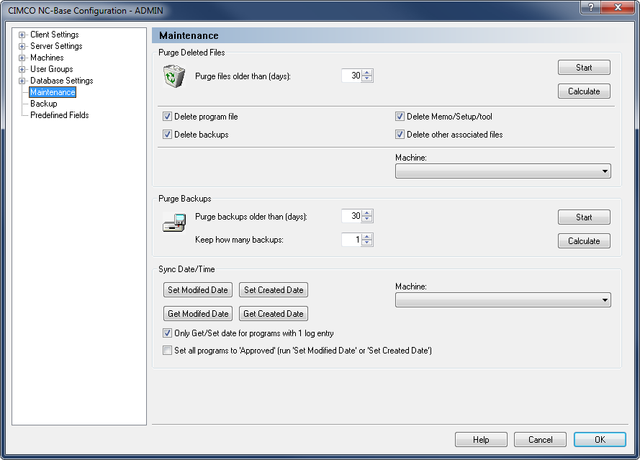
Setup in the Administration menu, or click the Setup dialog launch icon ![]() in the Database menu. Click on Maintenance in the left window of the CIMCO NC-Base Configuration dialog. The following dialog appears:
in the Database menu. Click on Maintenance in the left window of the CIMCO NC-Base Configuration dialog. The following dialog appears:
 |
|
Maintenance dialog. |
Use this field to specify the age of deleted files that should be purged.
Example: If you specify 30 in this field, all programs that were deleted more than 30 days ago will be purged from the database.
Click Start to purge the corresponding files, or click Calculate to calculate the result of running this operation first.
Click this button to purge deleted programs with the specified age.
Click this button to show the result of running this operation, without actually updating the database.
Check this field to physically delete program files from the hard drive, when a program is purged.
Check this field to physically delete backup files from the hard drive, when a program is purged.
Check this field to physically delete memo/setup/tool files from the hard drive, when a program is purged.
Check this field to physically delete other associated files from the hard drive, when a program is purged.
Select from the list, the machine for which the purge operation should be performed.
|
If you do not select a machine, the operation will be performed for all machines. |
Use this field to specify the age of backups that should be deleted.
Click Start to purge the corresponding files, or click Calculate to calculate the result of running this operation first.
Use this field to specify the number of backups to keep.
Example: If you specify 3 in this field, the 3 latest backups of a file will not be deleted.
Click this button to purge backups with the specified age.
Click this button to show the result of running this operation, without actually updating the database.
Use this button to set the program modified time to the last modified time of the associated program file.
To change the time for a single machine(group), select the machine(group) from the drop-down list to the right.
Click this button to set the program created time to the created time of the associated program file.
To change the time for a single machine(group), select the machine(group) from the drop-down list to the right.
Click this button to set the last modified time of the associated program file to the program modified time.
To change the time for a single machine(group), select the machine(group) from the drop-down list to the right.
Use this button to set the create time of the associated program file to the program created time.
To change the time for a single machine(group), select the machine(group) from the drop-down list to the right.
Select from the list, the machine for which you want to change the date/time.
|
If you do not select a machine, the date/time will be changed for all machines. |
Check this field if you want to get/set only the date for programs with 1 log entry.
Check this field if you want to set all programs to the status Approved.
Click this button to unlink all DNC-Max ports connected to machine groups. The association can be restored using the Restore button.
When you click this button, the following message appears:
 |
|
Unlink port message. |
Click Yes to unlink the DNC-Max ports, or click No to abort the operation.
Click this button to delete all DNC-Max ports in the NC-Base. The ports will be recreated next time DNC-Max is restarted, and the association can then be restored using the Restore button.
When you click this button, the following message appears:
 |
|
Delete port message. |
Click Yes to delete the DNC-Max ports in the database, or click No to abort the operation.
Click this button to restore association between machine groups and DNC-Max ports, using the log file. The following dialog appears:
 |
|
The Restore association dialog. |
Select a restore point on the list, and click OK to restore the link between machine group and DNC-Max ports. Click Cancel if you do not wish to restore the association.
After a restore has been performed, you can verify the association on the machine group page by clicking on Machines in the left tree of the configuration window. If the restore operation was not successful, you can choose another restore point and try again.
|
This option is only active if Backup machine group changes has been enabled under Server Settings. |